Pages

Thursday, July 31, 2014

Chalk paint pt1

Last weekend I went to my cousin's baby shower and got to see some family I haven't seen in a LONG time. It was wonderful to catch up and it really made me miss our annual Thanksgivings that ended almost 20 years ago! While there I spoke with a cousin about her chalk painting. I had seen pics of people doing this and was always fascinated with the transformations but figured it was an involved process and I didn't have the time or the need for it previously. But after moving into this new house we want a very different feel from our furniture. We had all dark wood pieces in the last house and now I want an old farm house feel. So this seems like the perfect way to transform the feel of the house without expending a bunch of money on new furniture. Wolf isn't crazy about the idea so I'm going to start with a piece he doesn't see and that I think is in desperate need of a makeover.... my grandma's sewing table.  


Sorry for the horrible picture. I was too lazy to shut the blinds to block the sun. Plus it's so messy; I am in the middle of sewing a t-shirt quilt and still have the scraps from the silkies I made for my cousin.
This piece currently lives in the guest room closet so if I don't like the result, no real harm done. Although I have been toying with the idea of moving the guest room to the basement and making this room my craft room. So one day it may be out in the open.

Now to decide on a color. When I look at pictures I find myself drawn to the white pieces the most. But this shares a room with some white dressers that I want to leave white. So even though it's in the closet, I want it to be a different color. So I'm thinking a dark grey like this one (via pinterest)


or a little lighter like this (also via pinterest)

Here are the colors to choose from

What do you think?

If this goes well I have plans for our coffee table, dining room table that's currently in the basement because it doesn't work at all with the upstairs decor, our bedroom dressers, nightstands, and headboard, and the guest room dresser and nightstand!

It will be awhile before I do this because I have to get the supplies, but I'll post progress as I can. 


Tuesday, July 29, 2014

Chicken food

I have been asked a lot about my homemade chicken food so I thought I'd write a little something up. Here are my ingredients from Azure Standard.

CodeBrandNameSizePriceQuantity
OL131Azure FarmFlax Seed Oil, Fresh, Organic32 ozs.$11.55


HS091Azure StandardKelp Powder4 ozs.$2.80
GP073BulkChicken Wheat, Organic50 lbs.$21.65
BE019BulkLentils25 lbs.$12.30
BE032BulkPeas Green, Whole25 lbs.$11.95
GP034BulkWhole Oats with Hulls - Animal Feed, Organic45 lbs.$21.45

The peas and lentils will last for many batches. I've had mine for over 6 months and am only half way through the bags. The kelp powder lasts 2-3 months and the flax seed oil lasts many months (again I've had mine for more than 6 months and still have about half a bottle left). Each batch is about 100lbs and costs me about .44/lb on these latest prices. I also buy black oil sunflower seeds (BOSS) from our local feed store when they have them on sale and add about 12lbs of those to a batch. 

I mix half the wheat and oats, the BOSS, a few ounces of kelp powder (for minerals), and a few tablespoons of flax seed oil in a large lidded trash can. I keep my fermentation bucket (post here) next to it (I'll be trying my fermented feeder this season - update, this version didn't work). I add 3 cups of this mix to the bucket after I feed 5-6 cups to the chickens each morning. The grains swell so much it only takes 3 cups to make 6 cups of food. I add water as necessary to keep everything under a few inches of water. The BOSS float but I don't worry about it. To feed I just pick up the inner bucket and let it drain, mix in the BOSS, then walk around the run to each feeding platter and dish out a scoop or two. They all love it and by the end of the day it's completely gone.  

For the peas and lentils I found the chickens wouldn't eat them at all if they were dry or fermented. I have begun to sprout those and feed on day 3. Each morning I bring a jar of sprouts out and empty it in the run with the rest of their food. Then I return to the kitchen where I store the peas and lentils and add 1/4c of each to the now empty quart jar. I fill with water and let sit overnight. The beans swell and the next morning I empty the water (I use tulle as a lid held on with the jar ring). They sit damp like that until the following day when they will be fed to the chickens and the cycle restarted. I have 2 jars going by the kitchen sink at all times so I always have one ready to feed.

I calculated the protein of the azure ingredients and my food is roughly 16-17% protein which is perfect for adult chickens. I, of course, have oyster shell out at all times for calcium. 
They also get any appropriate table scraps and are let out to free range any bugs they can catch whenever possible. Though their free ranging time outside of the run has been limited since the rabbit keeps escaping whenever I let them out and I really don't want to lose her to a fox!

Thursday, July 17, 2014

Fruit trees

Our local nursery was having a great sale so we couldn't pass up the chance to buy some fruit trees. Wolf was great a got out there and dug the holes for them. Little Owl originally picked out a yellow delicious, a cherry, and an apricot tree. Since the sale was so good we decided to get 2 varieties of each type. We ended up with yellow delicious and winter banana (a heritage variety) for our apple, Chinese dwarf and Moorpark for apricot, and royal Ann and black tartarian for cherry. 
Luckily we had some good rain before we got them and the next two evenings are planting them. They seem to be doing well except for the yellow delicious which the goats promptly escaped and ate all the leaves off the branches they could reach. Luckily it still has some left.
Now I'm on the look out for deer. If they come around or if the goats continue to escape and cause trouble I have a lot of wire I will use to create protection for the trees. 
The winter banana apple tree already has an apple on it. Little Owl can't wait for the rest to fruit.


Skunk!


Tues morning I get a text from Wolf after he leaves for work that he smelled a skunk. I too smell it's telltale stench when I get up. Outside it's not bad so I open the windows and go about my day. Later that evening as I sit down to the computer I keep smelling something off. I keep thinking it's my arms from stirring the kelp powder into the new batch of chicken feed. Then Wolf gets home and says it must be one of the dogs that smells. I go sniff each one, and he's right, it's Jasmine. Smells like she got a dusting in the wind from the skunk. I didn't do anything hoping it would wear off pretty quick since it wasn't too bad.
Then last night around 11:30 Jasmine is in the front yard barking up a storm and I can even hear her growling. She is not the type to bark at nothing, especially not growl. I knew something was out there. Wolf and I hop out of bed and grab a flashlight. I go out front and my nose tells me as soon as I open the door what is out there. Yep, you guessed it, the skunk. Jasmine was less than a foot away from it barking at it. I called Jasmine off (luckily she listened) and Wolf and I shooed the skunk out of the yard, which isn't as easy to do as you'd think. The whole time it was bouncing back and forth acting strange. It finally ran off and we were left with one stinky dog! Needless to say I wasn't about to give her a bath at midnight! Luckily the weather was nice and since she was still on alert she slept outside all night. The smell still got in the house a bit but it could've been much worse.
This morning I opened up the house, luckily it was a beautiful day and not overly hot. Then after a quick google search for the Mythbusters confirmed concoction for skunk remover, I got to work. Luckily I had everything on hand. Basically you take a quart of peroxide, amazingly I had a large unopened bottle sitting around. Add a cup or so of baking soda and a few drops of dish soap. I also added some water to make it go far enough to cover her. I took a sponge and rubbed it all over her. It said to avoid the face and ears so I did that the best I could while still getting her forehead. I let it sit for a few minutes then rinsed her off. She didn't seem to mind any of it until the cold water had run on her for a few minutes. After she dried I gave her a brushing that she was in desperate need of and took a sniff. The only spot that has any residual smell is her face. The rest smells faintly of baking soda. I'm impressed! I guess we'll just have to resist giving her kisses for a few days. ;)

The result of some much needed brushing

Monday, July 14, 2014

New digs

Well we finally did it! We sold our other house and bought a place on some land. We found a place on 5 acres with an existing chicken coop and run, a loafing shed, hay storage, tack room, and fenced backyard.We got a great deal on it because it needs some updating and repairs but nothing we can't handle.
Bad news is since we had our other house listed in April/May and we were moving in June there isn't much of a garden this year. I had a few measly tomato starts that managed to comeback after having their protective cover blown off and left in the blazing sun on one of the hottest days we had while they were first getting acclimated to outside, 1 purchased cucumber plant, 1 blueberry plant, 2 grape vines, 1 raspberry bush, and 2 strawberry plants. The tomato plants are so small I don't think we'll get any fruit off of them. But I have to try! Here they are in their mini greenhouses to protect them from the wind until they are stronger. These are also great for holding water around the plant. 
As you may have seen, we've added two goats to our menagerie and have plans for at least one horse and dairy cow. We have about 1500ft of fencing to replace/repair before that can happen though. And that's just in the back pasture for the horse! The front pasture will need some work too before it can hold a cow, hopefully not as much work though.
Overall we absolutely love it here. Let the serious homesteading begin!

Rocky enjoying the sunset

The tomatoes in their mini greenhouses
Chickens enjoying some free range time
Little Owl and Barley helping me secure the fencing for the goats.

Kombucha

At the fermenting potluck I signed up for about a month ago I tried a lot of stuff I normally wouldn't. I tried kombucha once before and wasn't a fan, it had a vinegar taste. This time I tried my friend's blackberry kombucha and another friend's black cherry kombucha and was pleasantly surprised. So I thought I'd take the plunge and got a scoby from my friend. 
My new  SCOBY
I took it home, brewed up some Lipton tea with a cup of sugar, let it cool, and added it to the scoby. 

Fermenting with tea
I let it sit for a week, then heated a bag of blackberries with a cup of sugar, let it cool, then combined the the kombucha and blackberries in another jar, brewed some more tea of the scoby, and let the blackberry mix sit for 3 days. Then I put the whole thing in the fridge. I had already packed my strainer so I left the fruit in the liquid. This batch was delicious. It tasted a lot like a blackberry Izzi drink. A little tart, a little fizz, a little sweetness. I had my friend try it who swears she doesn't like kombucha. It converter her as well and she left with a scoby for herself. She has since finished her first batch and loves it too.
The black cherry version by another friend was made by just adding juice to the kombucha. I took that lead with my second batch. I made some blackberry kombucha the same way as the first time but this time it had quite a bite to it. To mellow it I cut it with some cran-raspberry juice. It helped a lot.
The last batch I made I didn't have time to do anything with it so it sat for 2 weeks and smelled like it went all the way to vinegar (or close to it). I bottled it for a cleaning solution and started a new batch. I haven't decided what I want to do with the next batch.

Blackberries added

For those that don't know kombucha has a TON of health benefits, for example: cancer treatment and prevention, detox, arthritis, digestion, mood, etc. There are many website that explain the benefits better than I can, here's one http://www.foodrenegade.com/kombucha-health-benefits/

UPDATE: I have tried 2 batches using green tea and didn't like the end product nearly as much. It was good on it's own but got a strange flavor after adding the blackberries. Drinkable but only once diluted by something. I think I'll use green tea for straight batches only and use black tea for any fruit batches. 

Goats

We have an area in front of the barn and chicken coop that is fenced off and it is full of very tall weeds. I commented to Wolf that we needed some goats to mow the area down. To my surprise he said, "ok". Now, I've gone back and forth if I want goats or not. Goats are a PIA! They are escape artists and get into everything! Don't let those cute calm goats in the petting zoo fool you.
So I decided that if I were to get goats they would have to be dwarfs. As is my usual, I was perusing craigslists farm/garden section and came across 2 10wk old Nigerian dwarfs goats in my town that needed a new home. The actual town does not allow goats unless they are therapy animals and you get a variance for them. This is what the people tried to do but the city wanted over $800 for the variance and their neighbor wanted them to build a solid fence between their houses so that her dog wouldn't see the goats and bark at them! They decided it wasn't worth the money or fight to keep them.
They are the sweetest little PIAs ever. I had to re-fence all of the gates with fencing to cover any area over 3" wide. Any spot I missed the goats were quick to point them out. I came home more than once to the goats wandering around the driveway area.
The only area we had for them to sleep in is a stall of the shedrow. It only had a short gate on it so it made me very nervous about predators coming in the night to feast on my little goats. I got to work on changing the electric fence over from keeping horses in to keeping predators out. I took off the cord from around the back yard where we don't plan to keep horses and moved it to the bottom of the fence around the goat/chicken area. I plugged in our fence charger and... nothing. :-/ The light didn't even come on. I tested the plug in the shedrow to make sure it was working, it was. So I had to run out and buy a new charger. Got that connected, tested the fence (with an electric fence charger), and had voltage. I still have a few modifications to do to it, but I feel a lot better about the goats sleeping out there now.
Artemis
Holly

Automatic coop door

A few months ago I started working on an automatic coop door. I looked at a lot of designs and settled on one that used an electric screwdriver. I have no knowledge of electronics other than the general circuit stuff so this was quite a learning experience with a lot of reading done when things weren't working as they were supposed to. I used 2 limit switches, 1 double pole double throw (DPDT) relay (and I actually know what that is now!) and the parts from the screwdriver.
Basically the way it works is you plug in the screwdriver which charges the batteries. It is important to have those two power sources because you need a source of power to raise the door and another source to lower it. The limit switches stop the door at the top and the bottom. 

A limit switch
The power source is plugged in to a timer. When there is power to the screwdriver it goes in one direction, when there is no power it goes in the other direction, thanks to the DPDT relay.
I got the electronics working when we were still in the other house but had a hard time finding something to put on the screwdriver to act as a spool. I tried an empty thread spool but it caused the door to go too quickly. I tried a smaller one which helped with the speed but the rope would go over it and jam the screwdriver. I bought a 2" screwdriver bit and put a round piece of wood on it near the screwdriver to stop the rope from binding up. That part worked great. The biggest issue was that the door wouldn't always hit the limit switch at the bottom. This caused the door to lift back up and then jam up the screwdriver when it hit the top. This happened a couple times and I had a hell of a time getting the rope undone. If this had happened without me sitting there to turn off the screwdriver it would've easily burnt the motor. I knew this was happening because the frame would flex but I was really hoping it worked when everything was installed on the coop door. Next step was to install it on the coop. I first screwed it into place and made sure everything worked ok before cutting a hole in the door that I wouldn't be able to easily fix if it didn't. It worked perfectly. The door slid up and down just as it should. so I used a sawzall and cut a hole in the door. I setup the timer and right at 9:00 it shut and was open the next morning when I got up. It has been working perfectly the last few days. It is such a relief to not feel guilty about the chickens in the morning when I want to stay in bed, and like tonight when it was pouring rain around 9, it was nice to not have to go shut them up. 
Below is the near finished product. This was before I had figured out the spool. This one you can see this was the first larger spool I started with. I was originally using the small screwdriver bit that came with the screwdriver. The nice thing about this was it popped out of the screwdriver easily so when it jammed I could easily fix it. 
The white tracks were from a drawer and purchased for $2 at our local ReStore. The screwdriver was $10 at harbor freight. The cutting board was $10 at walmart but came with 2 other sizes that we use in the kitchen so we'll say $3 for the one. The limit switches were around $2ea (don't remember the exact price). The DPDT relay was $4. The wood was just scraps around the house. Overall it cost me roughly $25. Not bad considering ones you buy prefab cost $100+

Best thing ever!
The nearly finished product


Sunday, July 13, 2014

Purse

I finished my purse! I have never sewed anything substantial like this so I was a little nervous. First step was to fix my grandmother's sewing machine. The tension knob didn't adjust the tension anymore. It seemed to be missing a piece when I took it apart to try to figure out why it wasn't working. I found a replacement tension assembly, threw it on, and the machine works like new again.
I spent a boring plane ride making a lot of sketches of the shape, pockets, and compartments that I wanted. Then I used some extra fabric to make a test purse. I learned a lot with my test purse and was really glad I made it. I took notes so I wouldn't forget what I learned and it's a good thing I did because by the time I got back to making the real thing I had totally forgotten everything.

Overall I'm very happy with it. Only issue has been the pocket I use the most came unstitched. But once I get around to redoing it the purse will be great. The concealed carry compartment works great. It keeps my gun easily accessible but separate from all the other stuff. And you can't even tell I'm carrying. :)

The front - I use the small zippered pocket for my phone and most frequently used bank card.
The Back

Inside the concealed carry pocket
Inside the main pocket, note the zipper on the right, that leads to a deep pocket wide enough for a tablet (just in case I someday get one)

Yogurt


About a month ago I had signed up for a fermentation potluck. Unfortunately for me the only thing I've ever fermented is sauerkraut and beer. I didn't have any homemade beer on hand, and didn't feel like sauerkraut on it's own would be a very good showing. So I thought about something I could do quickly and easily. Yogurt fit the bill perfectly. Best part was I could use my crockpot and not having to monitor anything.
Milk heating up 
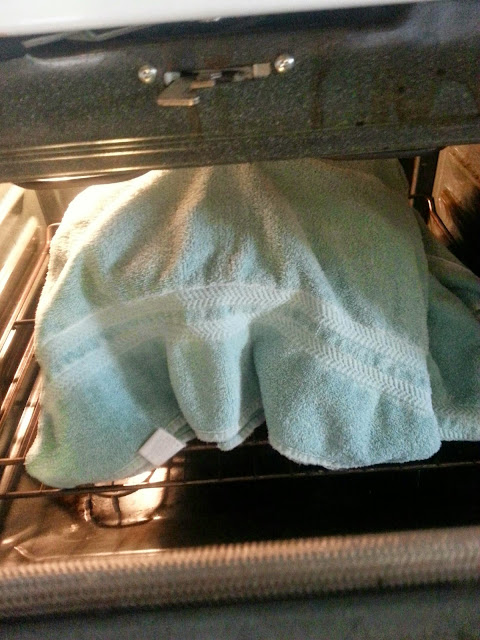
Luckily for me my crockpot will cook to a certain temp so I was able to pour the milk in, set the crockpot to 180deg and walk away. When it was done I turned off the crockpot and let it sit, coming back every once in awhile to check the temp. When it got to 110deg I took some milk out and mixed in my tablespoon of yogurt, then returned that mix to the milk. I gently stirred it (in an up and down motion) then wrapped the crockpot in a towel and stuck it in my oven.
Ready to rest in the oven
Since I had an electric oven I turned on the oven light and let it sit overnight. The next morning I poured it into a lined colander over a bowl and let it drain. Unfortunately I didn't have time before my potluck to let it drain as much as I'd like. But that's ok, I don't have to have yogurt as thick as greek yogurt. The problem for me came when the yogurt sat out at the potluck. The longer yogurt sits out, the more tart it gets. I'm not a huge fan of tart yogurt without something sweet in it to balance the flavors.
Overall though it was amazing how easy it was to make. I have subsequently made another batch and it was creamy and  delicious and have another one going right now.


Draining

Lemons

Our huge box of lemons

As I mentioned in my last post we got a large box of lemons. As a reminder Wolf and I juiced about half of them and froze the juice in sandwich baggies and wrote the amount of juice on each bag, everything from 1/2c to 1 1/2c. 

Juice ready to freeze
Then I zested the rest of them and froze the zest in small plastic wrap bundles of one lemon each. 

I also dried some zest and mixed it with salt and another batch with sugar.
Lemon zest drying
 I have used plenty of the little bundles of zest and they are perfect. So handy! I haven't had the chance to use the sugar or salt yet. I also dried a bunch of lemon slices to use in water but they molded. Yuck!
The best thing that came out of that box though was lemoncello! That turned out great. The only problem there is I have too much citric acid so the milk separates. I'm going to try another creamy batch with just zest soaked in the vodka.


Lemons marinating in vodka for lemoncello
Lemoncello and creamy lemoncello